
IPC477D PRO 6AV7250-7ED07-0PA0 Touch Screen Tablet Repair
IPC477D PRO 6AV7250-7ED07-0PA0 Touch Screen Tablet Repair

| Categories | SIMATIC IPC 477 |
|---|---|
| Brand | VICPAS |
| Model | 6AV7250-7ED07-0PA0 |
| Touch screen panel type | Capacitive |
| Size | 19 inch |
| Brand | Siemens |
| Warranty | 365 Days |
| Product Number | 6AV7 250-7ED07-0PA0 |
| Product Line | SIMATIC IPC477D PRO |
| Shipping | 2-4 Days |
| Supply Part | MMI Touch Panel |
| FOB port | Guangzhou, Shenzhen, Hongkong |
| Terms of Payment | Western Union, T/T, PayPal, Credit Card |
| Update Time | Dec 22,2024 |
SIMATIC IPC 477D PRO 6AV7250-7ED07-0PA0 Touch Screen Tablet Replacement Repair

Operating a capacitive multi-touch screen device
An inadequate earth connection or the lack of one may cause malfunction of the Siemens IPC 477D PRO 6AV72507ED070PA0 Touch Screen. Functions may not work properly. This can result in personal injury or property damage. Always connect the device to an earth conductor. The earth conductor from the device must be connected directly to earth with low impedance (short connection, minimum cross-section 2.5 mm2). Incorrect operation of devices with IPC477D PRO 6AV7250-7ED07-0PA0 Touch Membrane can occur. This can result in personal injury or property damage. Take the following precautions: Configure the plant so that safety-related functions are not operated with the Simatic 6AV7 250-7ED07-0PA0 Touch Panel. Switch off the device for cleaning and maintenance.
Note when operating the 6AV7250-7ED07-0PA0 Touch Digitizer Glass:
● Surface contact with a diameter of about 5 to 20 mm is required for an operator action to be detected.
● An operation with gloves with a material thickness less than 2 mm is detected in most cases. However, check the usefulness of the gloves you are using.
● To avoid incorrect operation, certain inputs are ignored and blocked from further entry:
1. Simultaneous operation with more than 5 fingers.
2. Surface contact with a diameter of more than 3 cm, for example, resting the palm of the hand on the 6AV72507ED070PA0 HMI Touch Glass.
3. As soon as the touch screen is no longer touched, input is possible again.
Specifications:
The table below describes the parameters of the Siemens IPC 477D PRO 6AV7250-7ED07-0PA0 Touch Membrane Parts.
| Product Line: | IPC 477D PRO |
| Storage Temperature: | -20~60°C |
| Display Type: | TFT LCD |
| Warranty: | 12 Months |
| Touch Size: | 19'' |
| Resolution: | 1366 x 768 Pixels |
| Part Number: | 6AV7 250-7ED07-0PA0 |
| Front Panel: | IP65 |
| Relative Humidity: | 90% |
| Brand: | Siemens |
Related SIMATIC IPC477 Series HMI Part No. :
| SIEMENS IPC477 HMI | Description | Inventory status |
| 6AV7250-3EC07-0HA0 | SIMATIC IPC 477D PRO Touch Screen Monitor | In Stock |
| 6AV7250-6GD07-0PA0 | SIEMENS IPC477D PRO MMI Touch Screen Repair | Available Now |
| 6AV7250-7ED07-0PA0 | SIMATIC IPC 477D PRO Touch Digitizer Replacement | In Stock |
| 6AV7250-0FB03-0BA0 | SIMATIC IPC477D PRO Touch Screen Replacement | Available Now |
| 6AV7254-3DD00-0AS0 | SIMATIC IPC 477D PRO Touch Panel Replacement | In Stock |
| SIMATIC IPC477 HMI | Description | Inventory status |
SIMATIC IPC477 Series Manuals PDF Download:
FAQ:
Question: How to mount the device?
Answer:
Prepared for support arm or stand without extension elements (flange on top)
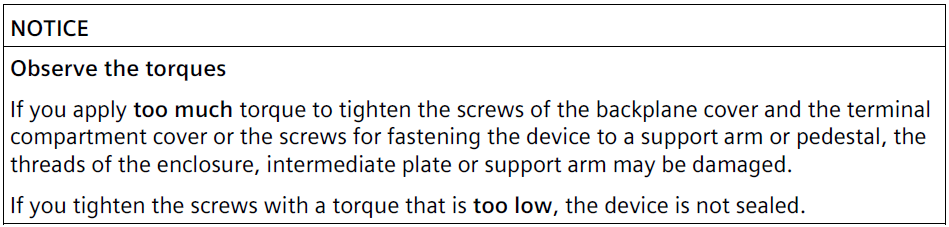
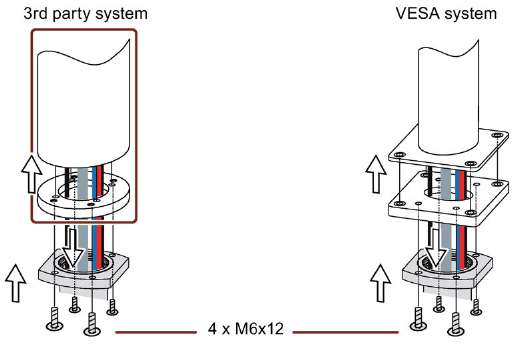
1. If an adapter plate for the Siemens base adapter is included in your support arm system, attach the adapter plate to the support arm with 4 M6x12 screws. Pay attention to the torque that is specified for the support arm.
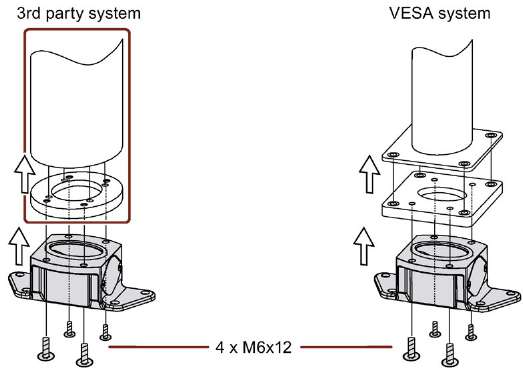
2. Attach the base adapter with 4 M6x12 screws to the mechanical interface of the support arm from below. Pay attention to the torque that is specified for the support arm.
3. Remove the screws ⑤ of the terminal compartment cover.
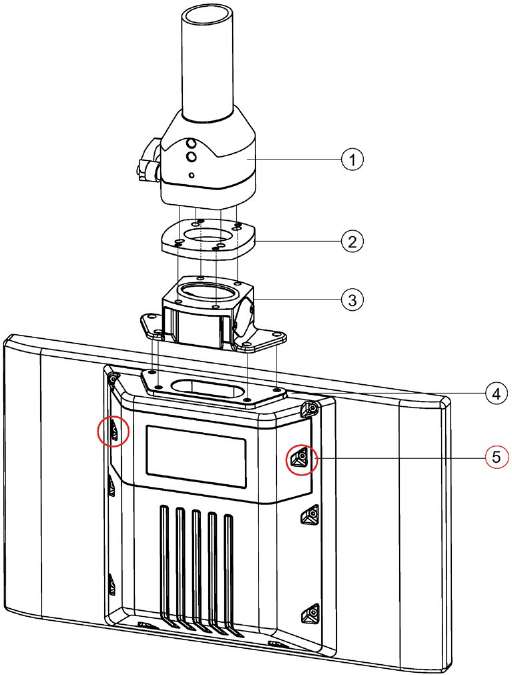
① Support arm head
② Intermediate plate
③ Base adapter
④ Countersunk head screws for device
⑤ Screws for terminal compartment cover
4. Open the terminal compartment cover ⑤ and set it aside safely.
5. Insert all connection cables through the opening of the PRO device.
Make sure that the connecting cables are not damaged.
Recommendation: Route large connectors (e.g. RS232 connectors) and their cables through the pedestal or support arm first.
6. Attach the device with 4 M4x12 countersunk head screws to the base adapter ③ from the top, torque 2.5 Nm.
Make sure that the connecting cables are not pinched.
7. Connect all cables according to the description in the section Connecting the device.
8. Fasten the cover plate ⑤ to the device with the 2 screws, torque 1.5 Nm.
Check that the seal is sitting correctly.
Prepared for support arm and extension elements (flange mount)
The following description shows an example of how to attach the PRO device to a support arm system using the optionally available Siemens flange mount ⑦. Mounting to a 48.3 mm round tube ⑧ that fits the opening of the PRO device is performed in a similar fashion.
1. Remove the screws ⑤ of the terminal compartment cover.
2. Open the terminal compartment cover and set it aside safely.
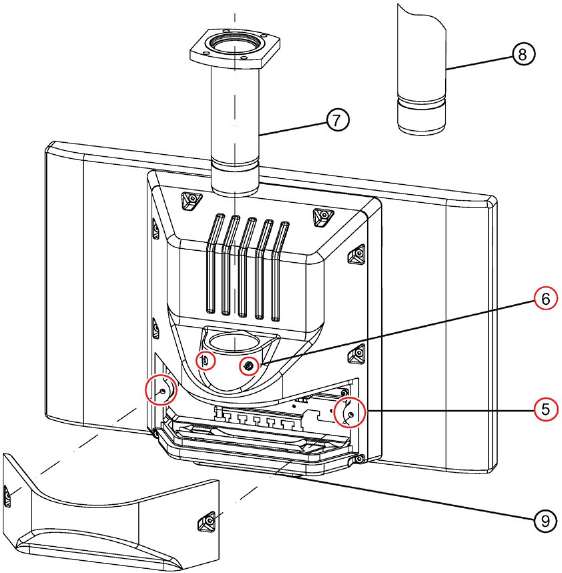
⑤ Screws for terminal compartment cover
⑥ Setscrews
⑦ Flange mount (not included in the product package; see System components
⑧ Third-party round tube (∅ 48 mm)
⑨ Cover plate
3. Grease the flange mount ⑦ or 48.3 mm round tube ⑧ with grease suitable for NBR seals, and insert the flange mount ⑦ or 48.3 mm round tube ⑧ into the corresponding opening of the PRO device.
Make sure that the sealing ring (O-ring) is not damaged. Fasten the flange mount with the 2 setscrews ⑥ M8x10 from the accessory kit.
Observe the appropriate torque:
– Siemens flange mount ⑦: 8 Nm
– 48.3 mm round tube of steel ⑧: 8 Nm
– 48.3 mm round tube of aluminum ⑧: 5 Nm

4. If an adapter plate ⑨ for the Siemens flange mount is included with your support arm, attach the adapter plate to the support arm with 4 M6x12 screws. Pay attention to the torque that is specified for the support arm.
5. Insert all connection cables through the opening of the flange mount or 48.3 mm round tube into the connection compartment of the PRO device. Make sure that the connection cables are not damaged.
6. Attach the device with 4 M6 screws, 16 mm to 20 mm long, to the support arm from below.
The screws are not included in the product package of the PRO device.
Pay attention to the torque that is specified for the support arm.
Make sure that all connecting cables are fed through the flange mount into the interior of the device without damage.
7. Connect all cables according to the description in the section Connecting the device.
8. Fasten the cover plate ⑤ to the device with the 2 screws, torque 1.5 Nm. Check that the seal is sitting correctly.
9. Fasten the cover plate ⑨ from the PRO device product package with 4 M4x12 screws, torque 1.5 Nm.
Alternatively, you can extend the PRO device by adding an Extension Unit at the bottom.
Read the associated documentation.
Question: What is the price of Siemens IPC477D PRO 6AV7250-7ED07-0PA0 Touch Screen Monitor?
Answer: Submit a fast quote, send VICPAS an email for best price.
Common misspellings:
6AV250-77ED07-0PA06AV7205-7ED07-0PA
6AV7250-7DE07-0PA0
6AV7250-7ED07P-0A0
AV7250-ED07-0PA0
- Loading...


- Tel
- *Title
- *Content
 Fast Quote
 Fast Quote
 Worldwide Shipping
 12 Months Warranty
 Customize Service
- Tel
- *Title
- *Content
