SIMATIC IPC477E 6AV7241-7JB08-0FA2 Touch Screen Monitor
SIMATIC IPC477E 6AV7241-7JB08-0FA2 Touch Screen Monitor

| Categories | SIMATIC IPC 477 |
|---|---|
| Brand | VICPAS |
| Model | 6AV7241-7JB08-0FA2 |
| Warranty | 365 Days |
| Shipping | 2-4 workdays |
| Brand | Siemens |
| Model | 6AV7 241-7JB08-0FA2 |
| Supply Parts | 6AV72417JB080FA2 Touchscreen Panel |
| Display Size | 15.6 inches |
| FOB port | Guangzhou, Shenzhen, Hongkong |
| Terms of Payment | Western Union, MoneyGram, T/T, Paypal, PayPal, T/T ,Credit Card, Western Union |
| Update Time | Dec 22,2024 |
Siemens IPC 477E 6AV7241-7JB08-0FA2 HMI Panel Glass Replacement

VICPAS offers an extensive range of high-quality accessories specifically designed for the SIMATIC IPC 477E HMI, catering to the diverse needs of industrial automation customers. From durable 6AV7241-7JB08-0FA2 Touch Membranes to reliable membrane keypads and protective overlays, VICPAS delivers components engineered to seamlessly integrate with the SIMATIC IPC 477E HMI, ensuring optimal performance and longevity.
VICPAS accessories 6AV7241-7JB08-0FA2 HMI Touch Glass for the SIMATIC IPC 477E HMI are meticulously crafted with precision engineering and premium materials, guaranteeing exceptional durability and reliability even in the most demanding industrial environments. Whether it's replacing a worn-out 6AV7 241-7JB08-0FA2 touchscreen, upgrading to a more responsive keypad, or adding a protective overlay for enhanced durability, VICPAS provides customers with solutions that enhance the functionality and longevity of their HMI devices.
With VICPAS accessories 6AV72417JB080FA2 HMI Panel Glass, customers can confidently optimize the performance of their SIMATIC IPC 477E HMI, prolong its lifespan, and minimize downtime, ultimately maximizing productivity and efficiency in their industrial operations. Trust VICPAS to deliver top-notch accessories that meet the highest standards of quality, reliability, and performance, ensuring the seamless operation of SIMATIC IPC 477E HMI devices for years to come.
Specifications:
The table below describes the parameters of the 6AV7 241-7JB08-0FA2 Siemens IPC 477E Touch Digitizer Glass HMI.
| Brand: | Siemens |
| Design of Display: | 15" TFT multi-touch |
| Product Line: | SIMATIC IPC 477E |
| Warranty: | 1-Year Warranty |
| Touchscreen: | Capacitive |
| Display Backlighting: | 50 000 h |
| Display Resolution: | 1366 x 768 pixels |
| Protection Grade: | IP65 |
| Model Number: | 6AV7241-7JB08-0FA2 |
| Power Supply: | AC 100-240V, 50/60Hz |
Related SIMATIC IPC 477E HMI Repair/Replacement Part Series No. :
| SIEMENS IPC 477E | Description | Inventory status |
| 6AV7241-5JB05-0DA0 | SIMATIC IPC 477E Series Touch Screen Monitor | In Stock |
| 6AV7241-5JB05-0FA0 | SIEMENS IPC 477E Series MMI Touch Screen Repair | Available Now |
| 6AV7241-5JB05-0GA0 | SIMATIC IPC 477E Series Touch Digitizer Replacement | In Stock |
| 6AV7241-5JB07-0FA1 | SIMATIC IPC 477E Series Touch Screen Replacement | In Stock |
| 6AV7241-5JB32-0DD0 | SIMATIC IPC 477E Series Touch Panel Replacement | Available Now |
| 6AV7241-5JC05-0FA0 | SIEMENS IPC 477E Series Touch Digitizer Glass Repair | In Stock |
| 6AV7241-5JH45-0GA2 | SIMATIC IPC 477E Series Touch Screen Glass Repair | Available Now |
| 6AV7241-7JB08-0FA2 | SIMATIC IPC 477E Series Touch Screen Panel Replacement | In Stock |
| 6AV7241-7JB40-0FA0 | SIEMENS IPC 477E Series Touch Membrane Repair Replacement | In Stock |
| 6AV7241-7JC06-0FA0 | SIMATIC IPC 477E Series Touch Glass Replacement | In Stock |
| SIMATIC IPC 477E | Description | Inventory status |
Siemens IPC 477E Series Manuals PDF Download:
FAQ:
Question: How to mount the device with mounting clips?
Answer:

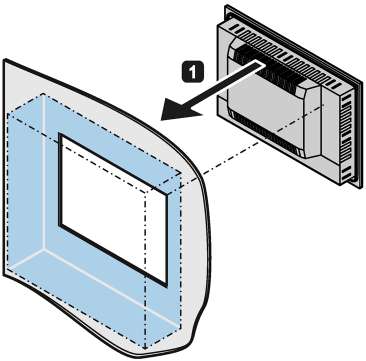
1. Working from the front, insert the device into the mounting cut-out. Secure the device to prevent it from falling out.
2. Insert a mounting clip into the cutout provided on the device.
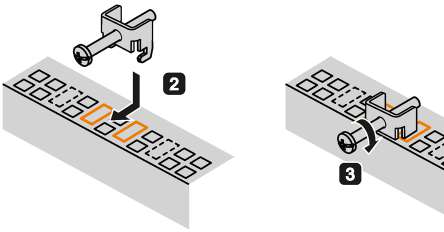
3. Tighten the threaded pin to secure the mounting clip. The maximum torque when tightening the threaded pins of the mounting clips is 0.5 Nm.
4. Repeat steps 2 and 3 for all mounting clips.
5. Check the fit of the mounting seal.
Question: How to mount the device with mounting brackets?
Answer:

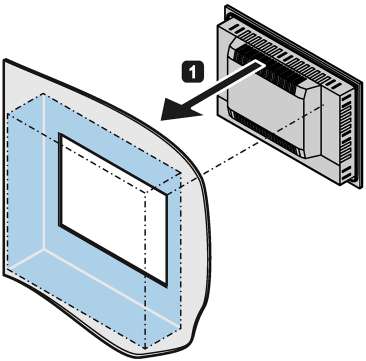
1. Working from the front, insert the device into the mounting cut-out.
2. Insert the mounting clamp into the recesses on the device.
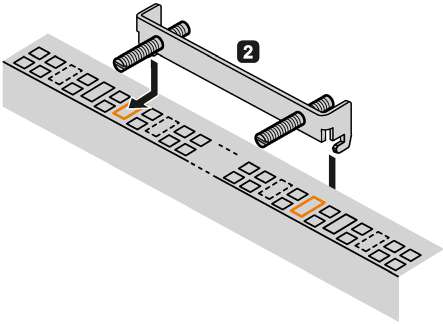
3. Secure the mounting bracket by tightening the threaded pins. The maximum permissible torque is 0.5 Nm.
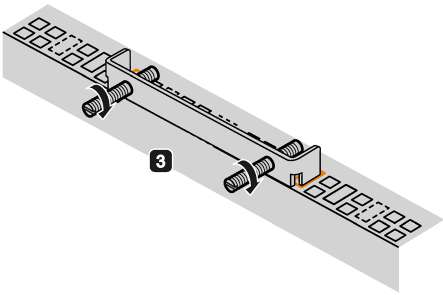
4. Repeat steps 2 and 3 until all mounting brackets are attached.
5. Check the fit of the mounting seal.
Common misspellings:
6AV7241-7B08-0FA2
6A7241-7JB08-0FA2
6AV7241-7JB0-80FA2
6AV7241-7JBo8-0FA2
6AV72241-7JB08-0FA2
- Loading...
- Tel
- *Title
- *Content
 Fast Quote
 Worldwide Shipping
 12 Months Warranty
 Customize Service
- Tel
- *Title
- *Content


 Fast Quote